Showing posts with label Roses. Show all posts

Romantic Cottage Pink Rose Christmas Ornaments ~ Hats, Fans, Ribbons, Lace, Pearls and Feathers


Hello,
I would like to share some of the Romantic Christmas ornaments that I made.
♥These are decorated with lace, ribbon, pearls feathers and roses♥
I made these using little straw hats and bamboo fans.
Here is a view from the back of the little bamboo fans.
A set of stiffened lace fans folding accordion style.
♥The little bamboo fans♥
These are more fans and mini straw hats with tiny pink rosebuds.
♥I love how the little ones turned out ... so adorable ♥
I also did some in burgundy colors!
Thank you for stopping by and I hope you enjoyed these!


Love,
Beverly


Shabby Cottage Christmas Tree With Roses ~ Tutorial

Hello,
Today I would like to share with you a simple tutorial
on how to make a mini Christmas tree decoration
in a vintage urn vase.

I purchased this little white urn vase at a yard sale over the summer
and after looking it at if for a few months...
thought it would be pretty with a little tree inside.

For this project you will need:
A small vase
6" faux evergreen tree
strand of pearls
2 dozen silk rosebuds
a small piece of floral foam
a bit of spanish moss
Ribbon
Pip berries
glue gun and glue
For most of you seasoned crafter's you already know 
how to do these but thought I would add this for someone who may not :)
Please excuse my messy work area ;)
First using hot glue you would glue your piece of floral foam into the vase.
Next add a bit of spanish moss to the top of the foam
just using enough to cover it
My little tree had a wooden base so I just unscrewed it from the base.
Next you insert the bottom of the tree into the vase into the foam.
I always glue mine first so the tree stays in.
Ta Da!  Now you can start decorating it.
I decided to use rosebuds, pearls and pip berries for mine.

I usually start at the top when adding pearls
and just put a dab of hot glue on the end of the strand of pearls
and tuck in into the branches at the top close to the center.
Then just continue wrapping the pearls around until you get to the bottom.
Next I added the roses by snipping off the wires
and gluing them all around the tree and added two bows 
at the top on each side.
And I finished it off by gluing in some pip berries
and straitening out the branches.
And here is my finished tree :)

There are so many things you can use to make these little trees...
I have made them in tea cups, small tins, old coffee and tea pots, 
clay pots, jars, glass measuring cups and more.  
Take a look around your house or keep your eye out at yard sale and thrift stores
and I'm sure you can find something to use for a base for a little tree!
The great thing is they are inexpensive and you can decorate them
to whatever theme or decor you like!
Thanks for stopping by,
Beverly

Linking up with Rook No. 17 

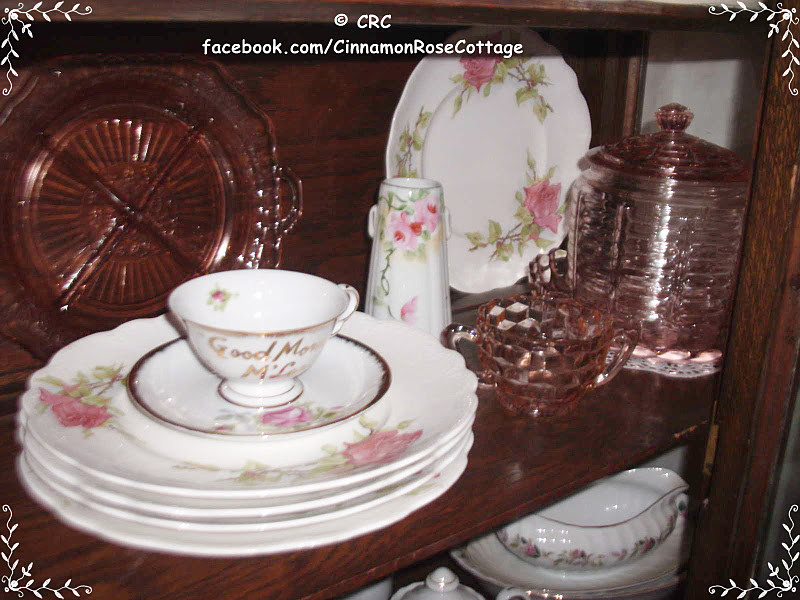
Collection of Vintage Rose Dishes


Hello,
Well instead of Spring cleaning I have been doing some Fall cleaning
mainly because I didn't get to it in the Spring... or Summer for that matter!
I love collecting vintage dishes especially ones with roses
but I really don't enjoy the job of washing them all!
But needless to say they needed to be done!
I finally got them all back in my china closet...
but still haven't got the vintage doilies washed and back in ... sigh!
The set on the top shelf are one of my favorites.
I found them at a yard sale in perfect condition for $3.50 for the set!
They have wild roses on them and I think they are beautiful.
The second shelf is a mismatch of rose dishes and my
very small collection of pink depression glass.
This set of dishes I bought when I was 17 years old
from an elderly lady that I cleaned for.  
Wow that was 30 years ago! Shhh... lol
The funny thing is I have about 20 dinner plates
and only 1 cup! 
Someday........ I plan on using some of the extra plates for a 
broken china table mosaic and looking for some more matching cups.
So there you have it my nice clean collection of 
vintage rose dishes in my china closet :)
 I made this rose pomander ball to hang on the key.
I hope you enjoyed looking at
part of my collection of vintage dishes!


Thanks for stopping by,
Beverly

Gold Tone Thrifty Finds Repainted Cottage White


Hello,
I wanted to share a few tag sale finds 
that I repainted white.  
First is a set of vintage metal Homco wall fans.
These were previously gold tone.
I had originally planned to add vintage rhinestones to the fans
so after I painted them I put them in this metal picture easel (also originally gold tone)
so they wouldn't get scratched.

But for now I think they look so pretty just the way the are!
I paired them up with a metal teapot that I had previously 
painted white (originally gold tone too!) that I had decorated 
with ribbons, pearls and roses and I think they look great together!
I have them sitting on a glass cake plate on top of my hutch♥
These were all tag sale finds
and with only a few coats of white paint...
turned them into beautiful thrifty cottage style decor!.
Thank's for stopping by,
Beverly

Sweet Shabby White Cottage Pumpkins With Pearls and Lace

Hello,
I was so inspired by the sweater pumpkins in my previous post
that I decided to try my hand at them.
I made mine from the arm of  a white sweater and added pearls and lace to it.
Here is another one I made only I added some pink rosebuds to this one.


I followed the basic tutorial for the sweater pumpkins found here.
Thanks for looking!
Love,
Beverly

First Roses Blooming In My Garden


Hello,
I hope you are having a beautiful day.
It is a cooler mostly cloudy day here
but it was nice for getting the grass mowed this morning.

I wanted to share some photos of the first roses blooming
in my garden. 
I just transplanted these a couple of weeks ago
and I was pleasantly surprised to see them bloom so fast!
Here are also some photos of my peonies blooming.

This bush is just getting ready... look at all the blooms!
Have a wonderful day!
Love,
Beverly