Showing posts with label Ribbon. Show all posts

Stiffened Vintage Doily Covered Glass Vase ~ Shabby Cottage Decor ~ Tutorial

Hello,
I am going to be sharing my first tutorial of the new year!
I had an old clear glass vase that had white water stains in it
and I tried everything to get the stains out.
I tried using vinegar, denture cleaning tablets, magic eraser
and even tried a Brillo pad... but I could not get the stains out.

I loved the shape of the vase and being me I did not want
to just throw it away... 
which as most people who know me personally ...
this would come as no surprise :)
So I decided to repurpose this by covering it 
with a vintage stiffened crocheted doily!!!
You will only need a few simple materials to do this:
Glass or plastic vase
Doily large enough to cover the entire vase
Home made Mod Podge = All purpose glue and water
Rubber bands
A piece of ribbon if desired
You will probably want to lay down a piece of newspaper,
wax paper or aluminum foil because this can get messy!
Now I never actually measure the glue and water mixture
I just add about a half of cup of glue into a bowl
and add enough water a little at a time 
stirring until it is about the consistency of milk.
It averages about equal half a cup of glue to half a cup of water.
Next add your clean, dry doily into mixture and make sure 
it is completely wet with the glue and water mixture.
Again this can get messy and  you can use rubber gloves
but I just squish it around in the bowl 
making sure it is completely covered.
Turn your vase upside down elevated by something...
I used one of my milk glass vases because it was tall.

Then drape your wet doily over the vase
and secure with rubber bands.
Since my vase was shaped at the top and bottom
I added 2 rubber bands to show the shape of the vase.
This is the time to adjust or shape your doily 
so that it is evenly distributed around the vase.
Let dry overnight!
When dry remove the rubber bands and add
a ribbon of your choice or it looks pretty plain too.
I added a pink wired ribbon to mine :)
These also look pretty with tea light candles 
or a string of lights inside!
Add some real or silk flowers and your done!
These would also make great Valentine's Day or Mother's Day Gifts.
I hope you enjoyed this and thank you for stopping by!
love,
Beverly
Sharing this at

Romantic Cottage Pink Rose Christmas Ornaments ~ Hats, Fans, Ribbons, Lace, Pearls and Feathers


Hello,
I would like to share some of the Romantic Christmas ornaments that I made.
♥These are decorated with lace, ribbon, pearls feathers and roses♥
I made these using little straw hats and bamboo fans.
Here is a view from the back of the little bamboo fans.
A set of stiffened lace fans folding accordion style.
♥The little bamboo fans♥
These are more fans and mini straw hats with tiny pink rosebuds.
♥I love how the little ones turned out ... so adorable ♥
I also did some in burgundy colors!
Thank you for stopping by and I hope you enjoyed these!


Love,
Beverly


Shabby Cottage Christmas Tree With Roses ~ Tutorial

Hello,
Today I would like to share with you a simple tutorial
on how to make a mini Christmas tree decoration
in a vintage urn vase.

I purchased this little white urn vase at a yard sale over the summer
and after looking it at if for a few months...
thought it would be pretty with a little tree inside.

For this project you will need:
A small vase
6" faux evergreen tree
strand of pearls
2 dozen silk rosebuds
a small piece of floral foam
a bit of spanish moss
Ribbon
Pip berries
glue gun and glue
For most of you seasoned crafter's you already know 
how to do these but thought I would add this for someone who may not :)
Please excuse my messy work area ;)
First using hot glue you would glue your piece of floral foam into the vase.
Next add a bit of spanish moss to the top of the foam
just using enough to cover it
My little tree had a wooden base so I just unscrewed it from the base.
Next you insert the bottom of the tree into the vase into the foam.
I always glue mine first so the tree stays in.
Ta Da!  Now you can start decorating it.
I decided to use rosebuds, pearls and pip berries for mine.

I usually start at the top when adding pearls
and just put a dab of hot glue on the end of the strand of pearls
and tuck in into the branches at the top close to the center.
Then just continue wrapping the pearls around until you get to the bottom.
Next I added the roses by snipping off the wires
and gluing them all around the tree and added two bows 
at the top on each side.
And I finished it off by gluing in some pip berries
and straitening out the branches.
And here is my finished tree :)

There are so many things you can use to make these little trees...
I have made them in tea cups, small tins, old coffee and tea pots, 
clay pots, jars, glass measuring cups and more.  
Take a look around your house or keep your eye out at yard sale and thrift stores
and I'm sure you can find something to use for a base for a little tree!
The great thing is they are inexpensive and you can decorate them
to whatever theme or decor you like!
Thanks for stopping by,
Beverly

Linking up with Rook No. 17 

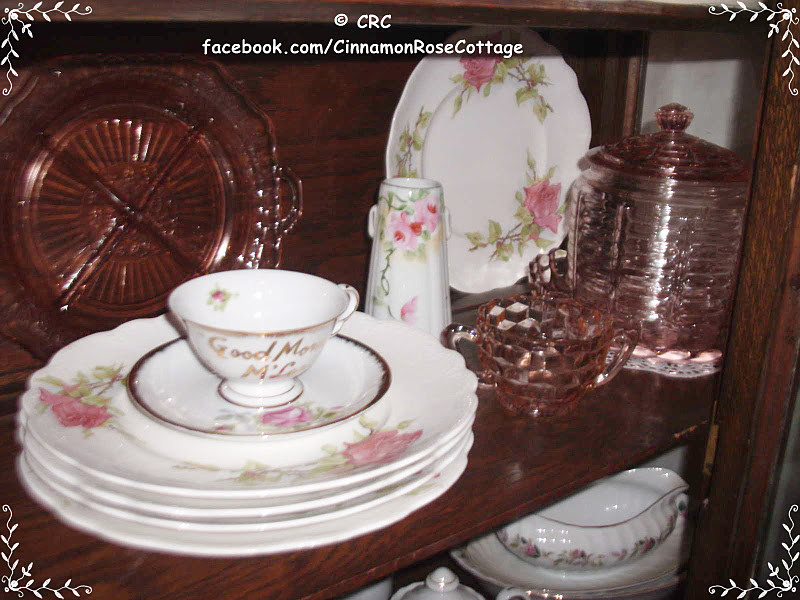
Collection of Vintage Rose Dishes


Hello,
Well instead of Spring cleaning I have been doing some Fall cleaning
mainly because I didn't get to it in the Spring... or Summer for that matter!
I love collecting vintage dishes especially ones with roses
but I really don't enjoy the job of washing them all!
But needless to say they needed to be done!
I finally got them all back in my china closet...
but still haven't got the vintage doilies washed and back in ... sigh!
The set on the top shelf are one of my favorites.
I found them at a yard sale in perfect condition for $3.50 for the set!
They have wild roses on them and I think they are beautiful.
The second shelf is a mismatch of rose dishes and my
very small collection of pink depression glass.
This set of dishes I bought when I was 17 years old
from an elderly lady that I cleaned for.  
Wow that was 30 years ago! Shhh... lol
The funny thing is I have about 20 dinner plates
and only 1 cup! 
Someday........ I plan on using some of the extra plates for a 
broken china table mosaic and looking for some more matching cups.
So there you have it my nice clean collection of 
vintage rose dishes in my china closet :)
 I made this rose pomander ball to hang on the key.
I hope you enjoyed looking at
part of my collection of vintage dishes!


Thanks for stopping by,
Beverly

Twig Heart With Pink Roses


Hello,
They are calling for bad storms in our area today
so I wanted to share this twig heart wreath I just made
with you while I am able to get online.
I painted the twig heart shape white
and added silk roses, babies breath,
pearls, feathers and a wired pink organza bow.
I also added a pink mushroom bird
in a nest made of pearls!
If I was a bird I would love this nest! 
Matthew 6:26 - Look at the birds of the air: they neither sow nor reap nor gather into barns, and yet your heavenly Father feeds them. Are you not of more value than they?
Thanks for looking and have a great day!
Love,
Beverly

Mother's Day Gift Idea...Romantic Ivy Bowl Candle Holder

Hello,
Today I want to share with you how to make a beautiful candle holder from a glass ivy bowl and a glass votive candle holder.  These are so easy and only take about 15 minutes to complete. 


I purchased the ivy bowl and candle holder at The Dollar Tree.  Hint: While you are in the store make sure that the candle holder will fit inside of the ivy bowl.


Materials Needed:
Glass Ivy Bowl
Glass Votive Candle Holder
Piece of Lace
Piece of Ribbon
String of Craft Pearls
Feathers
Small Silk Roses
Candle or Battery Operated Tea Light Candle
Glue Gun/ Glue

First make sure that your ivy bowl and candle holder are clean and all stickers are removed.

Fill the ivy bowl with your choice of feathers.


Using your hot glue gun apply 4 dots of glue around the top of the ivy bowl and insert the candle holder quickly before the glue dries.


Take a piece of lace and wrap around the ivy bowl and glue the ends together.

Then wrap a piece of ribbon around the lace and glue the ends.


And then you would also take a strand of pearls and wrap around on top of the ribbon and glue the ends.

Then make a little bow out of the ribbon and glue this in the center where the lace, ribbon and pearls meet. (to hide where you glued)


Then add a string of pearls to the center of the bow to dangle down.


And then glue your two rosebuds in the center of the bow.

Add a battery operated tea light or a votive candle and you are done!

These are so versatile!  Instead of feathers you could add buttons and little spools of thread tied off with a measuring tape, potpourri, mini kitchen items, old jewelry... the possibilities are endless!!!
This makes a beautiful and inexpensive gift esp. for Mom for Mother's Day and would also be a beautiful table centerpiece for a wedding.

I hope you enjoyed this craft and thank you for stopping by my blog.
Love,
Beverly