Showing posts with label Vintage. Show all posts

St. Patrick's Day ~ Clay Pot Leprechaun Hats and Emerald Tree's

Hello,
Happy St. Patrick's Day! 
I know I'm a little late with post but
hopefully you can use these ideas for next year!
I wanted to share a few more of my decorations!
A mini clay pot Leprechaun hat!
I simply painted it green, added a band of vintage lace
and a vintage clover shaped rhinestone clip on earring.
And a moss and emerald covered ball made 
with table scatter stones from the dollar tree.
 These table scatter stones are like huge beads and 
they have holes in the center... so I used a touch of 
hot glue and a half of toothpick to make mini picks.
Then I covered the Styrofoam ball with moss
and randomly inserted the stones around the ball.
I just put the ball in a little white rocking chair planter 
but you could also add a piece of ribbon to hang these.
Than I sat my little hat on top of it
and added a vintage post card image.
I also found these little Easter or Spring tree's
in the Dollar Store and it fit perfectly inside a 
vintage milk glass vase I have.
I topped it off with a bit of reindeer moss
and added the table scatter beads onto the wire tree.
The holes in the beads were large enough 
that the wire branches fit right through them!
There were also a couple of stones
without holes in the shape of diamonds
so I just scattered them on top of the moss.


An Irish Blessing
May the road rise to meet you,
May the wind be always at your back,
May the sun shine warm upon your face,
The rains fall soft upon your fields and,
Until we meet again,
May God hold you in the palm of His hand. 

Love,
Beverly

Follow Me on Pinterest


Quick and Easy St. Patrick's Day Banner ~ Made from Paper Clips and Free Printables

Hello,
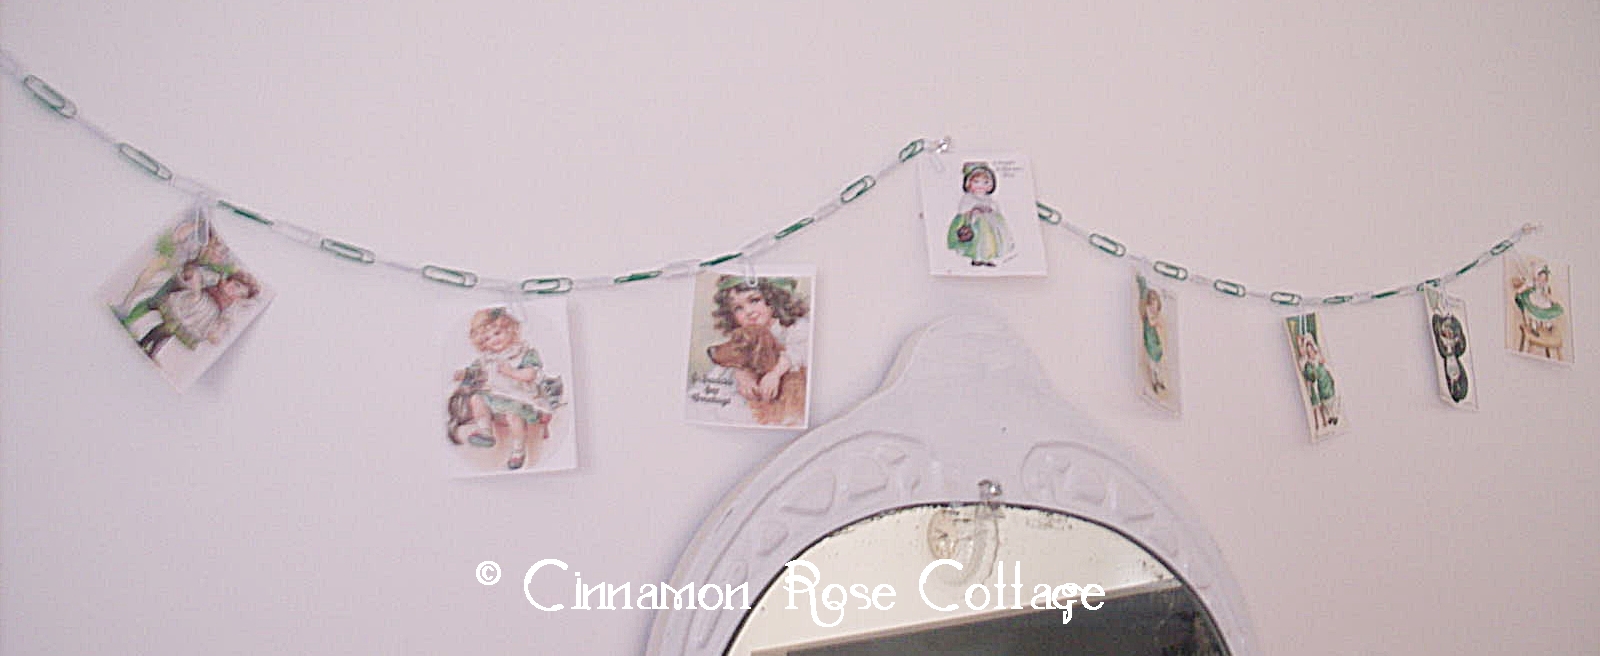
Here is a quick and easy last minute decoration
you can make for St. Patrick's Day!
I made this by using plastic coated colored paper clips
that I purchased at the dollar store.
These come in assorted colors and I sorted them
and attached them alternating white and green.
Then I printed out some free vintage images
from these lovely sites...
and

Then I attached them to the paper clip banner!
So easy and inexpensive.

Thank's for stopping by and I hope you enjoyed this.
Love,
Beverly


Follow Me on Pinterest

Happy Leap Day ~ A Marriage Proposal???

Hello everyone,
Happy Leap Day!
Now here is a Leap Day Fun Fact that is new to me ~
According to Irish tradition, February 29 is a special day set aside 
where women may ask for a man’s hand in marriage!
Had I known this I may have lined up some prospects!!  ;~)

Here are a few fun vintage postcards I found at


Guess I will have to wait another 4 years!

Here is a fun post you can find on AttaGirls Blog
about Leap Year's Most Eligible Bachelors
from a newspaper article from 1888
Stop by and see which one you would have chosen!

Hope you enjoyed these!
Love,
Beverly


Follow Me on Pinterest

Stiffened Vintage Doily Covered Glass Vase ~ Shabby Cottage Decor ~ Tutorial

Hello,
I am going to be sharing my first tutorial of the new year!
I had an old clear glass vase that had white water stains in it
and I tried everything to get the stains out.
I tried using vinegar, denture cleaning tablets, magic eraser
and even tried a Brillo pad... but I could not get the stains out.

I loved the shape of the vase and being me I did not want
to just throw it away... 
which as most people who know me personally ...
this would come as no surprise :)
So I decided to repurpose this by covering it 
with a vintage stiffened crocheted doily!!!
You will only need a few simple materials to do this:
Glass or plastic vase
Doily large enough to cover the entire vase
Home made Mod Podge = All purpose glue and water
Rubber bands
A piece of ribbon if desired
You will probably want to lay down a piece of newspaper,
wax paper or aluminum foil because this can get messy!
Now I never actually measure the glue and water mixture
I just add about a half of cup of glue into a bowl
and add enough water a little at a time 
stirring until it is about the consistency of milk.
It averages about equal half a cup of glue to half a cup of water.
Next add your clean, dry doily into mixture and make sure 
it is completely wet with the glue and water mixture.
Again this can get messy and  you can use rubber gloves
but I just squish it around in the bowl 
making sure it is completely covered.
Turn your vase upside down elevated by something...
I used one of my milk glass vases because it was tall.

Then drape your wet doily over the vase
and secure with rubber bands.
Since my vase was shaped at the top and bottom
I added 2 rubber bands to show the shape of the vase.
This is the time to adjust or shape your doily 
so that it is evenly distributed around the vase.
Let dry overnight!
When dry remove the rubber bands and add
a ribbon of your choice or it looks pretty plain too.
I added a pink wired ribbon to mine :)
These also look pretty with tea light candles 
or a string of lights inside!
Add some real or silk flowers and your done!
These would also make great Valentine's Day or Mother's Day Gifts.
I hope you enjoyed this and thank you for stopping by!
love,
Beverly
Sharing this at

Pink, Silver and White ~ Vintage Tiered Plant Stand Christmas Tree

Hello,
As promised I am going to share with you my
vintage metal 3 tiered plant stand 
that I transformed into my dining room 
Christmas tree!
I usually put up an artificial tree in my dining room
but I was looking at my plant stand that is already there
and sits inside my vintage picket fence tree base
and thought that is almost the shape of a tree!
Not sure if it came from pure creativity or pure laziness this year :)
As I said in my previous post I found vintage
silver tinsel and icicles in my Mom's attic...
so I started wrapping the metal plant stand with the tinsel.
It was still lacking the shape at the top of the "tree"
so I had a small lattice and turned it upside down to make the top!
I wrapped the lattice with tinsel and topped it with
a pink wired bow.
I covered my flower pots with aluminum foil
and added lights and cotton snow.
I added some of my pink satin Christmas balls
and put my Angel dressed in white and silver beside it.
Added a few left over strands of silver icicles
and it became my Dining Room tree!  
Had to laugh because the angel moves and 
when I plugged it in our dog started barking at her :)
(((Now if I could only get rid of that ugly rust colored carpet)))
♥Looks really pretty with my table top pink and silver tree♥


Thanks for stopping by and I hope you enjoyed this!
love,
Beverly